How to enable brokerage in TradeDiary
Track the real cost of every trade and let TradeDiary show your net profit or loss after fees—not just the number before charges.
Quick answer
From your TradeDiary dashboard, select the settings cog in the top bar. Switch on Enable Brokerage, choose Enter Manually or Calculate from Broker, and then select Save Settings. The New Trade form will now show a Fees field beside P&L.
What is brokerage?
Brokerage is the cost of executing a trade through a broker. In everyday trading conversations, “brokerage” is also used as a short name for the complete set of charges deducted from a trade.
Your final cost can include the broker’s fee, Securities Transaction Tax (STT), exchange transaction charges, GST, SEBI charges, stamp duty, and other segment-specific charges. The exact amount depends on your broker, instrument, exchange, trade type, turnover, and applicable rates.
Broker fee
The charge applied by your broker for executing an order.
Taxes & levies
STT, GST, stamp duty, SEBI charges, and other statutory costs.
Exchange charges
Transaction charges that vary by exchange and market segment.
Why brokerage changes your trading results
Gross P&L tells you how the price moved in your favour or against you. Net P&L tells you what you actually kept after costs. A strategy can appear profitable before fees and become unprofitable after frequent entries, exits, and charges.
In this example, ignoring ₹10 of fees overstates the result by 11.1% compared with the ₹90 actually retained. Tracking charges makes win rate, average win, expectancy, profit factor, and strategy comparisons more trustworthy.
Enable brokerage in TradeDiary: step by step
Use the visual walkthrough below. The highlighted controls mirror the current TradeDiary dashboard and settings flow.
Open Advanced Settings
Sign in and go to your dashboard. In the top-right area of the navigation bar, select the round settings cog.
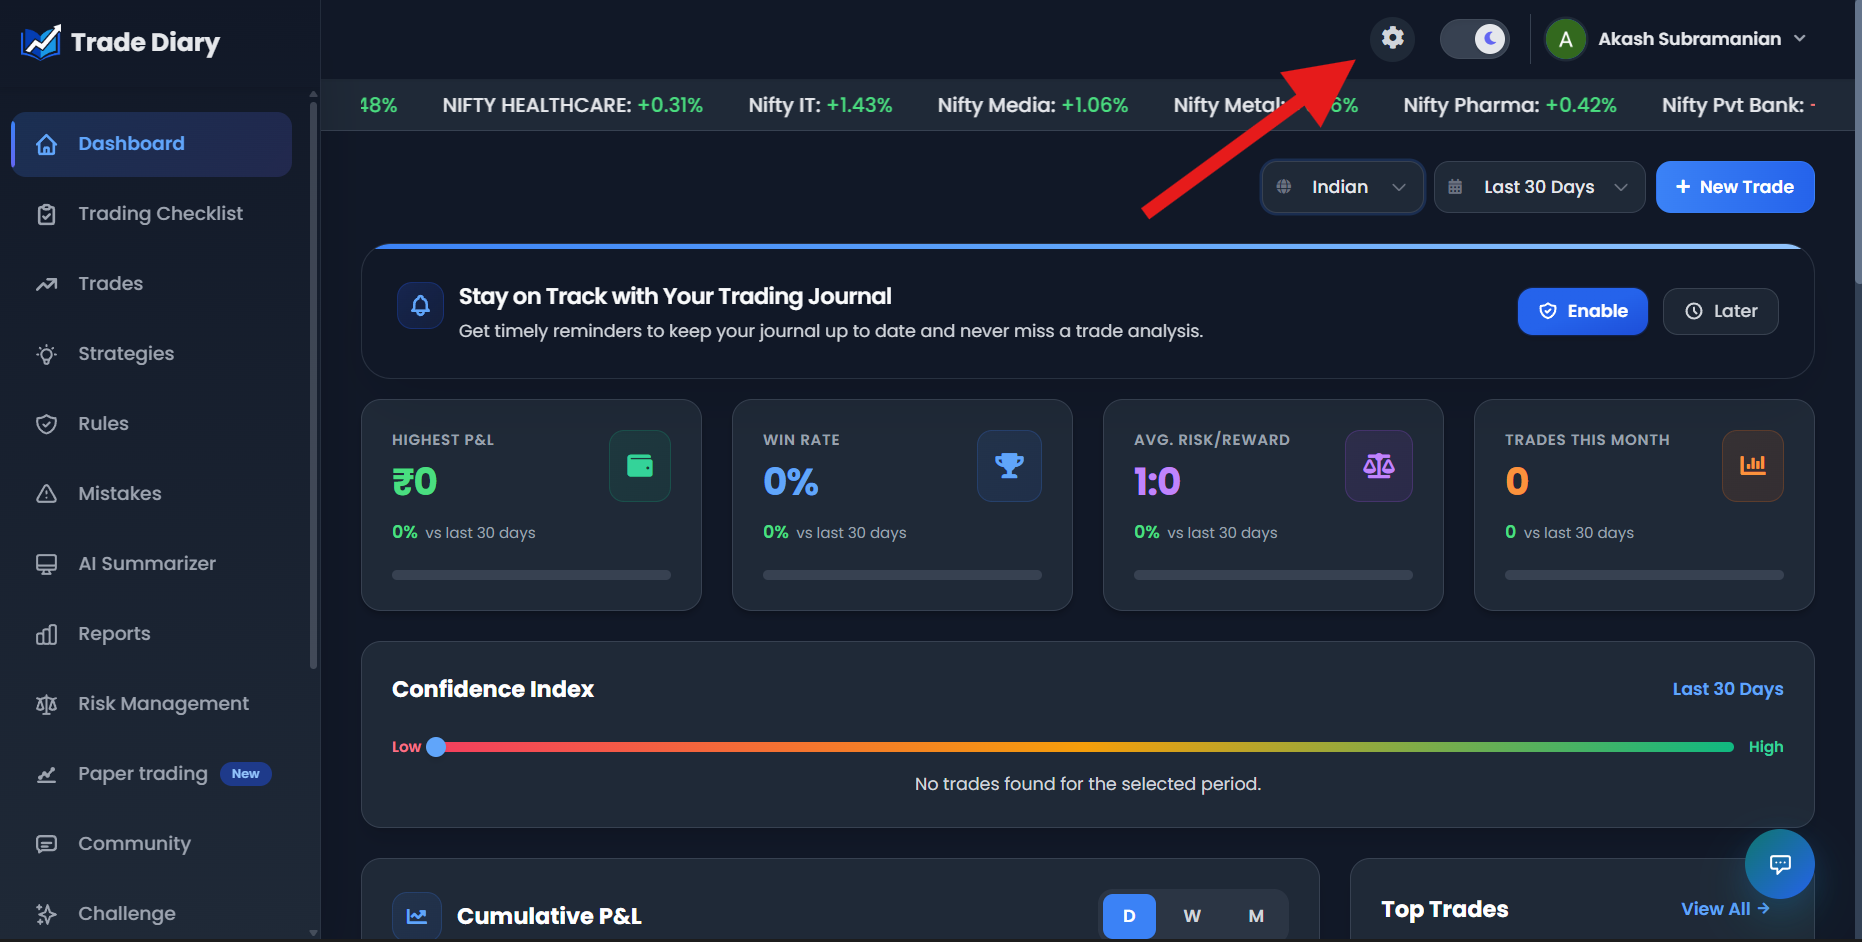
Dashboard with an arrow pointing to the Settings cog
01-open-settings.png
Switch on Enable Brokerage
The Advanced Settings window opens. Find the Enable Brokerage card and turn on its switch. A calculation-method selector appears immediately below it.
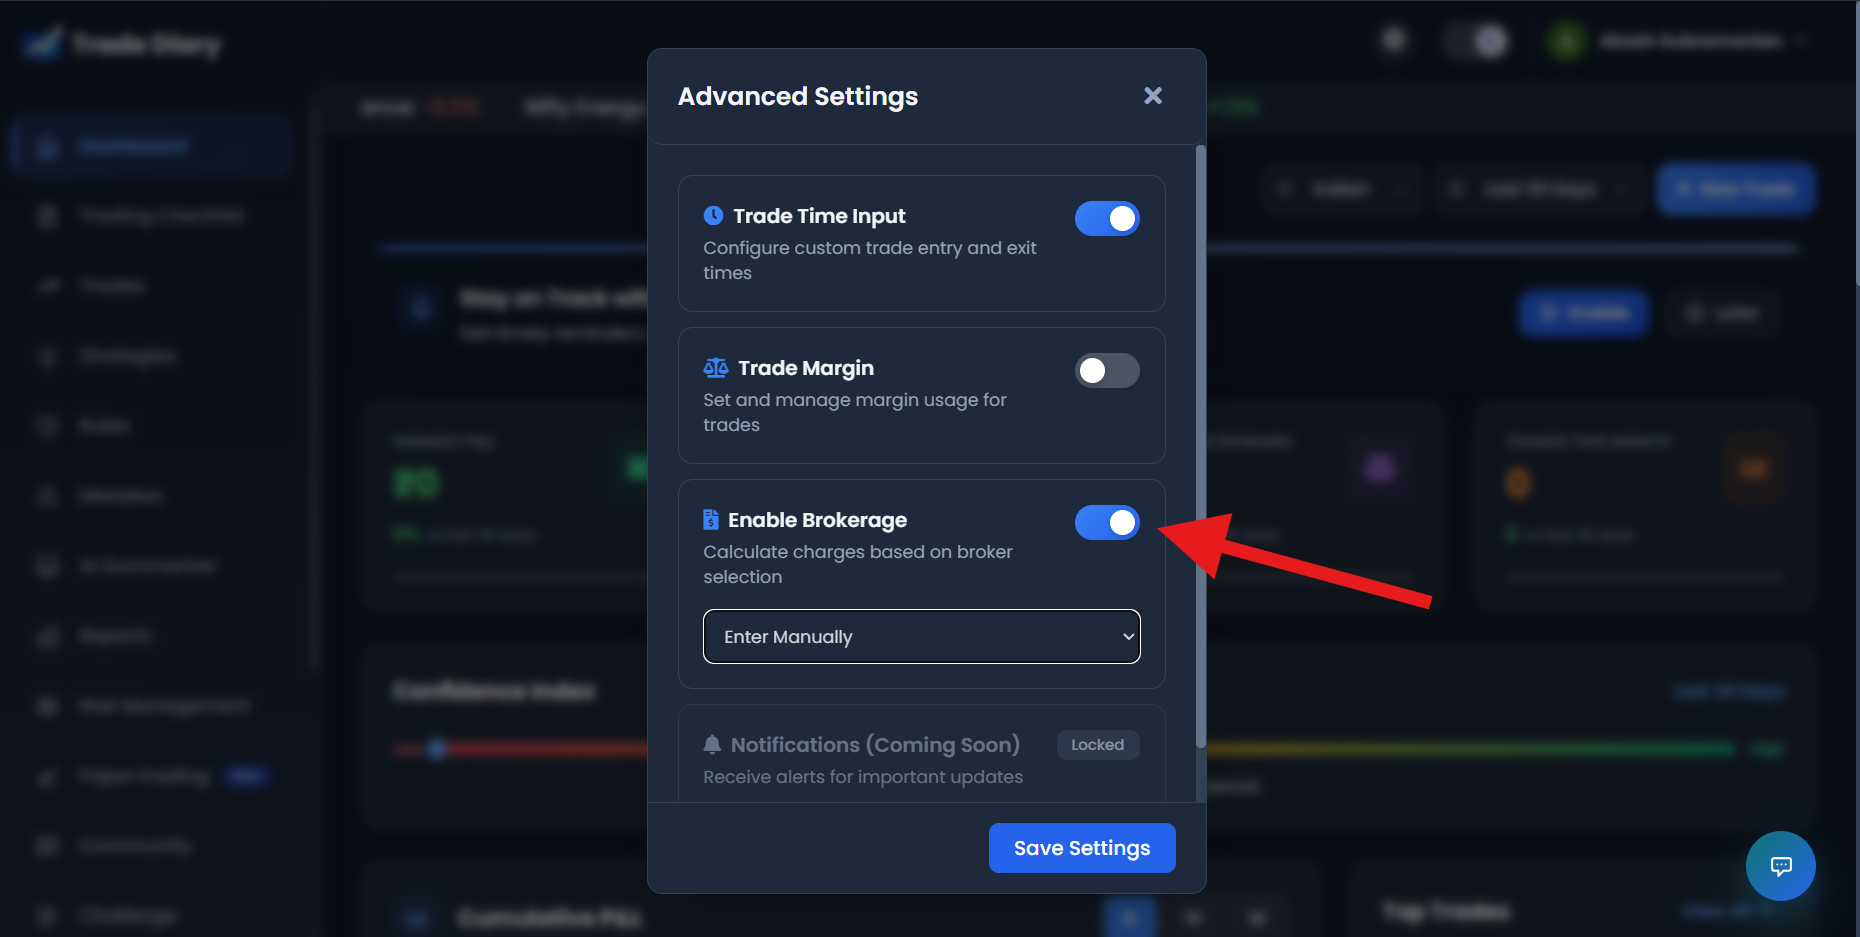
Enable Brokerage switch, calculation method, and Save Settings
02-enable-brokerage.png
Choose how fees should be added
Enter Manually
Best when you want to enter the exact total from your broker’s contract note or statement. Add the amount in the Fees field for each trade.
Calculate from Broker
TradeDiary calculates total charges from supported trade details such as symbol, entry, exit, quantity, and duration. Verify estimates against the broker statement when exact reconciliation matters.
Automatic charges can vary slightly from the broker’s final contract note. You can adjust a fee manually when needed.
Save your settings
Select Save Settings. TradeDiary stores the preference, closes the window, and reloads the page so the brokerage-aware trade form is ready to use.
Use the Fees field when logging a trade
After brokerage is enabled, select New Trade. The trade form shows Fees beside the P&L Amount field. In manual mode, enter the total charge yourself. In automatic mode, TradeDiary fills the field after the required trade details are available.
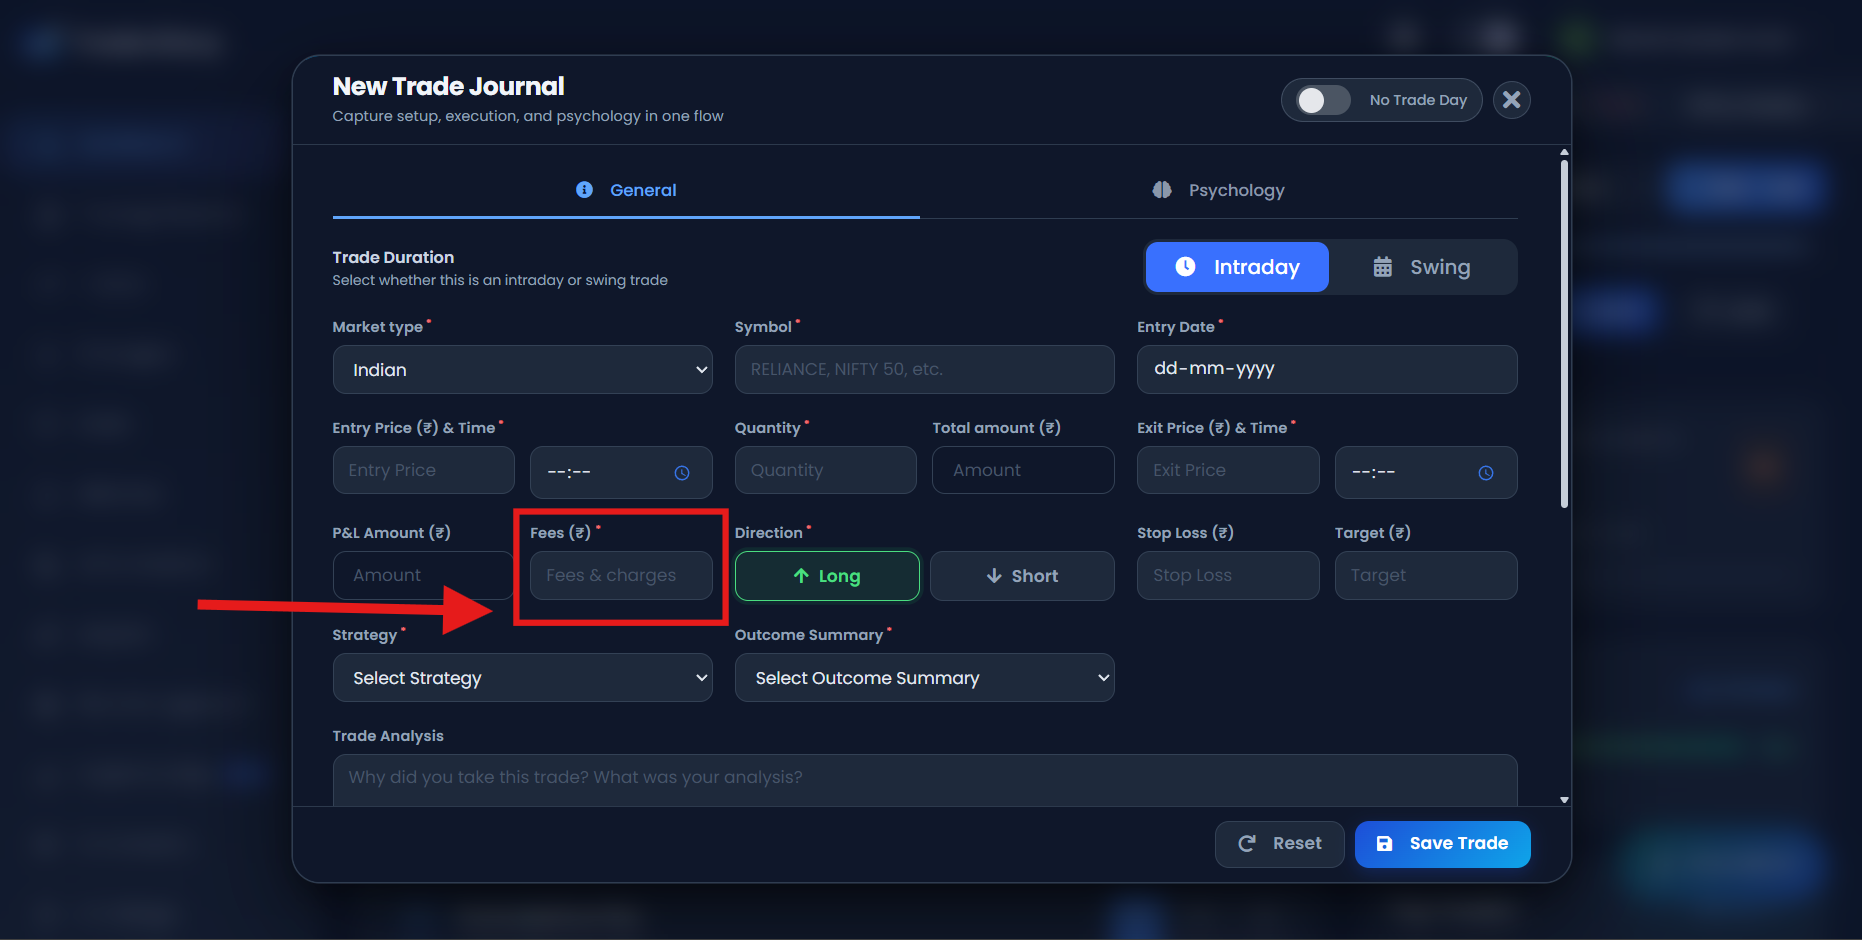
New Trade form showing Fees and net P&L after charges
03-fees-and-net-pnl.png
What improves once fees are tracked?
- More accurate P&L: results reflect the money retained after charges.
- Better strategy review: compare setups using net performance rather than inflated gross returns.
- Realistic trade sizing: see whether small targets still make sense after costs.
- Cleaner reporting: dashboard and journal calculations use a consistent cost-aware result.
How to minimise the impact of brokerage
There is no single “ideal” brokerage amount for every trader. The useful number is the cost relative to your gross profit, turnover, and average edge. If charges repeatedly consume a large share of profitable trades, review the process.
Track cost per trade. Review both the rupee value and the percentage of gross P&L lost to fees.
Avoid unnecessary churn. More orders and repeated re-entry can increase total charges without improving the setup.
Compare broker plans carefully. Consider the segments you trade, order frequency, taxes, platform charges, and service—not only the advertised brokerage rate.
Reconcile regularly. Compare TradeDiary with contract notes so estimates stay aligned with actual costs.
Common questions
Does TradeDiary subtract fees from profit automatically?
Yes. With brokerage enabled, the Fees amount is deducted from gross P&L. For example, ₹100 gross profit with ₹10 of fees becomes ₹90 net profit.
Can I change from manual to automatic later?
Yes. Return to Advanced Settings, choose the other method, and save again. The selected method is used when you next log or edit trades.
Why might automatic fees differ from my contract note?
Final broker charges can depend on broker-specific rates, rounding, instrument classification, and current statutory charges. Use the contract note as the source of truth for exact reconciliation.
See the result behind every trade.
Open Trade Diary, enable brokerage, and start reviewing net performance instead of gross numbers.